
Setting up a qualitative (fixed scale) page
Qualitative pages enable you to create questions where participants answer using a qualitative scale. This article shows you how to set up a qualitative page, run follow-up and open rounds, and read the results.

Overview
These pages can be used to validate a set of elements like indicators, criteria, strategies or policies. From this point on, let's assume you need to ask your participants to validate a set of indicators using a Likert scale.
- Each round can have as many qualitative (fixed scale) pages as you want, but on each page the qualitative scale is fixed.
- If you have set up a qualitative page in a previous round, you can only edit some details for that page in later rounds. More on this in "Follow-up rounds" below.
The article covers:
- Setting up a qualitative page.
- Follow-up rounds.
- Round results.
- Open round type.
Setting up a qualitative page
Opening the page
- On the "Round details" screen, click "ADD NEW PAGE" and choose "Delphi - Qualitative (fixed scale)". Every new round already includes one.
- Click the page name to open it.
The panel on the left has four sections: "Texts", "Settings", "Indicator custom fields" and "Scale levels". The indicators (questions) are listed on the right.
1 – Texts
- "QUESTION TEXT" – the statement or question that sets the basis for the participants' work, for example "This indicator should be used in the health index". It is shown at the top of the page, above the table with your indicators.
- "FOOTER TEXT" and "INFO TEXT" – optional extra texts.
Please keep in mind that you can always use a Survey page to give instructions on earlier pages, so try to keep your question as short as possible.
2 – Settings
- Participants can add new indicators (Premium plan) – runs an "open round", where participants can add indicators to the list (see "Open round type" below).
- Participants can see indicator details – shows an eye icon next to each indicator, which opens its description and details.
- Participants can comment – lets participants add a comment to each indicator, for example to justify their opinion.
- Randomize indicators order – shows the indicators in a different order to each participant.
In later rounds, you will also find Show comments from previous round (checked by default), which lets participants read the comments made in the previous round ("VIEW PREVIOUS ROUND COMMENTS").
3 – Indicator custom fields
To give your participants more information about each indicator, or to organise the page, create your own fields. Imagine you want to sort your indicators by area or type. An indicator can have several custom fields.
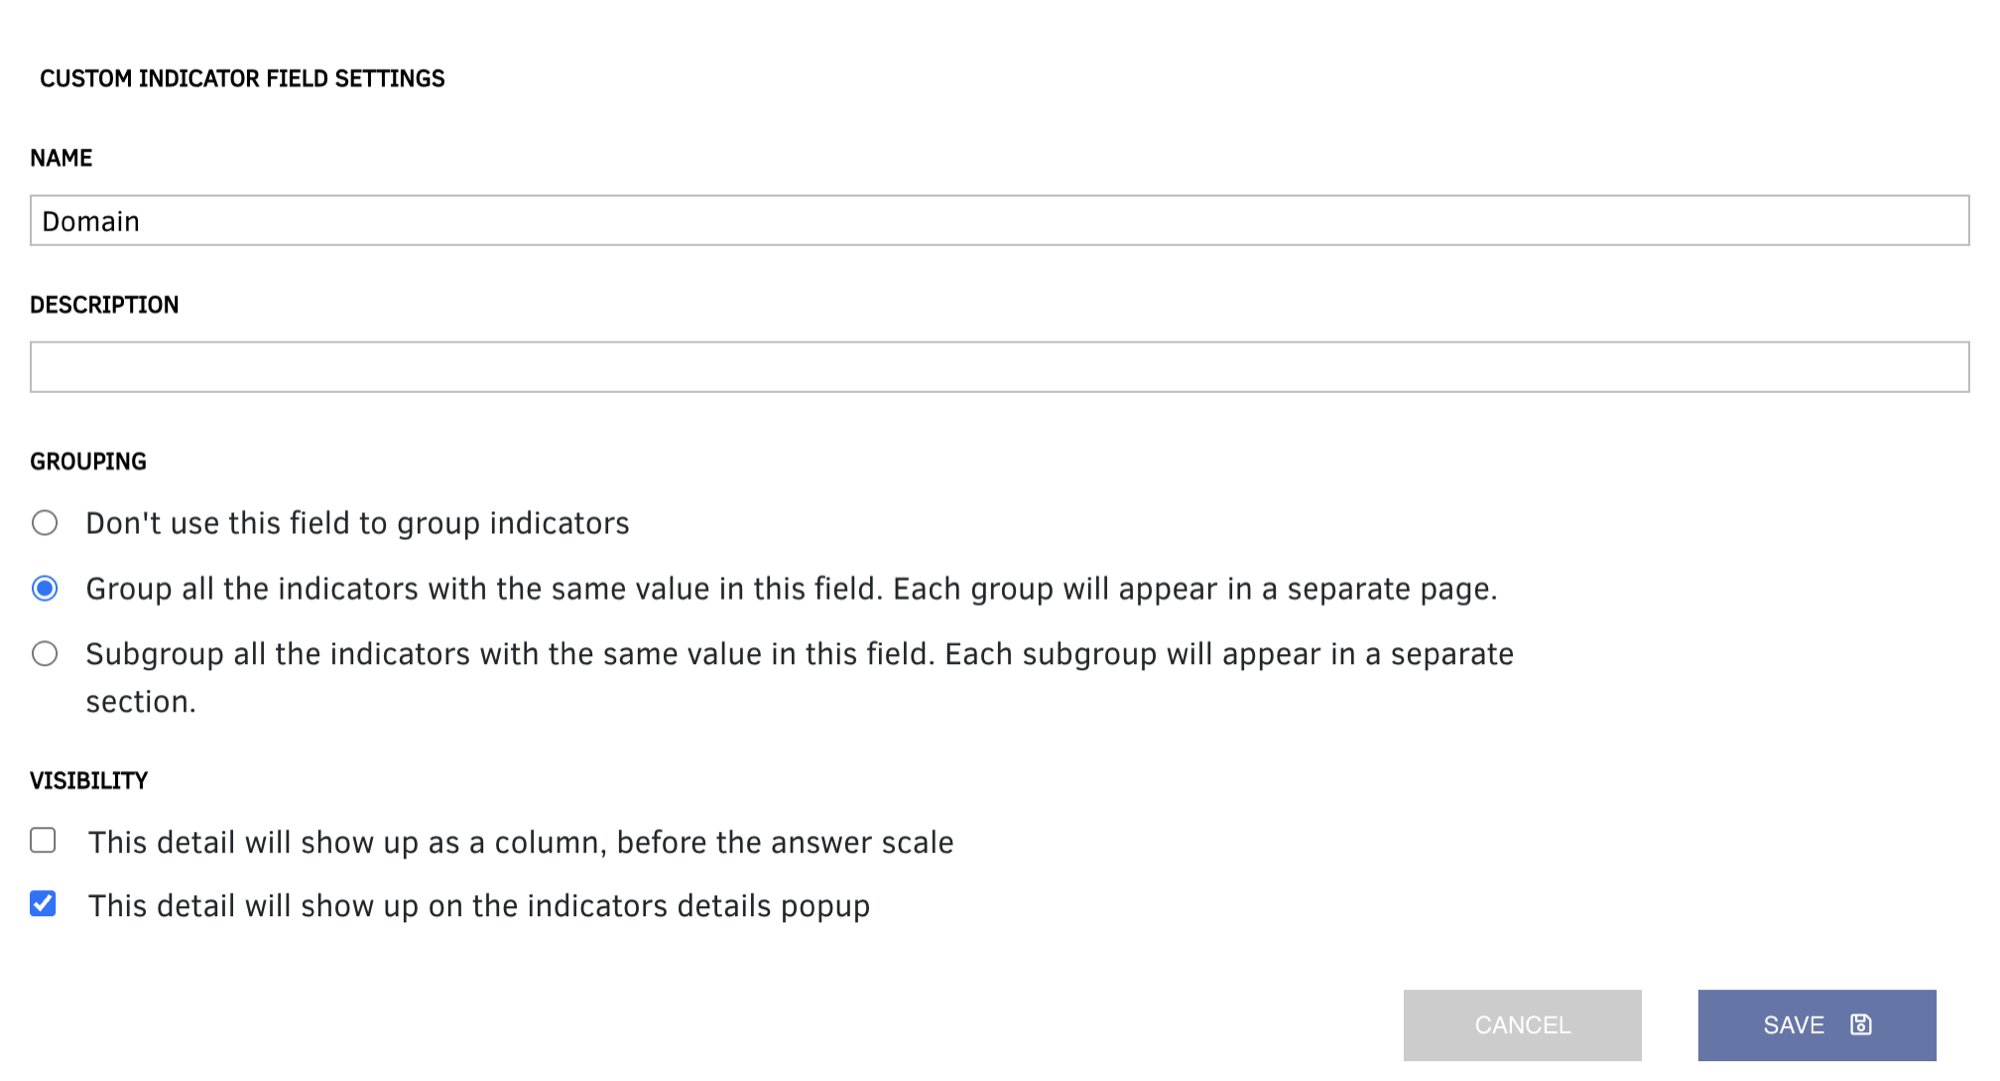
- Click "ADD FIELD" to open the "Custom indicator field settings" window.
- Give the field a NAME and, optionally, a DESCRIPTION.
- Choose a GROUPING option and the VISIBILITY options (see below).
Under GROUPING:
- "Don't use this field to group indicators".
- "Group all the indicators with the same value in this field. Each group will appear in a separate page."
- "Subgroup all the indicators with the same value in this field. Each subgroup will appear in a separate section."
Under VISIBILITY (you can check both):
- "This detail will show up as a column, before the answer scale".
- "This detail will show up on the indicators details popup".
Please keep in mind:
- You can only use one field to group indicators and one to subgroup them on each qualitative page.
- Every field can be edited or deleted.
- When you group or subgroup indicators, the list on the right side of the page shows the groups.
For a step-by-step example, see Grouping indicators into pages and sections.
4 – Scale levels
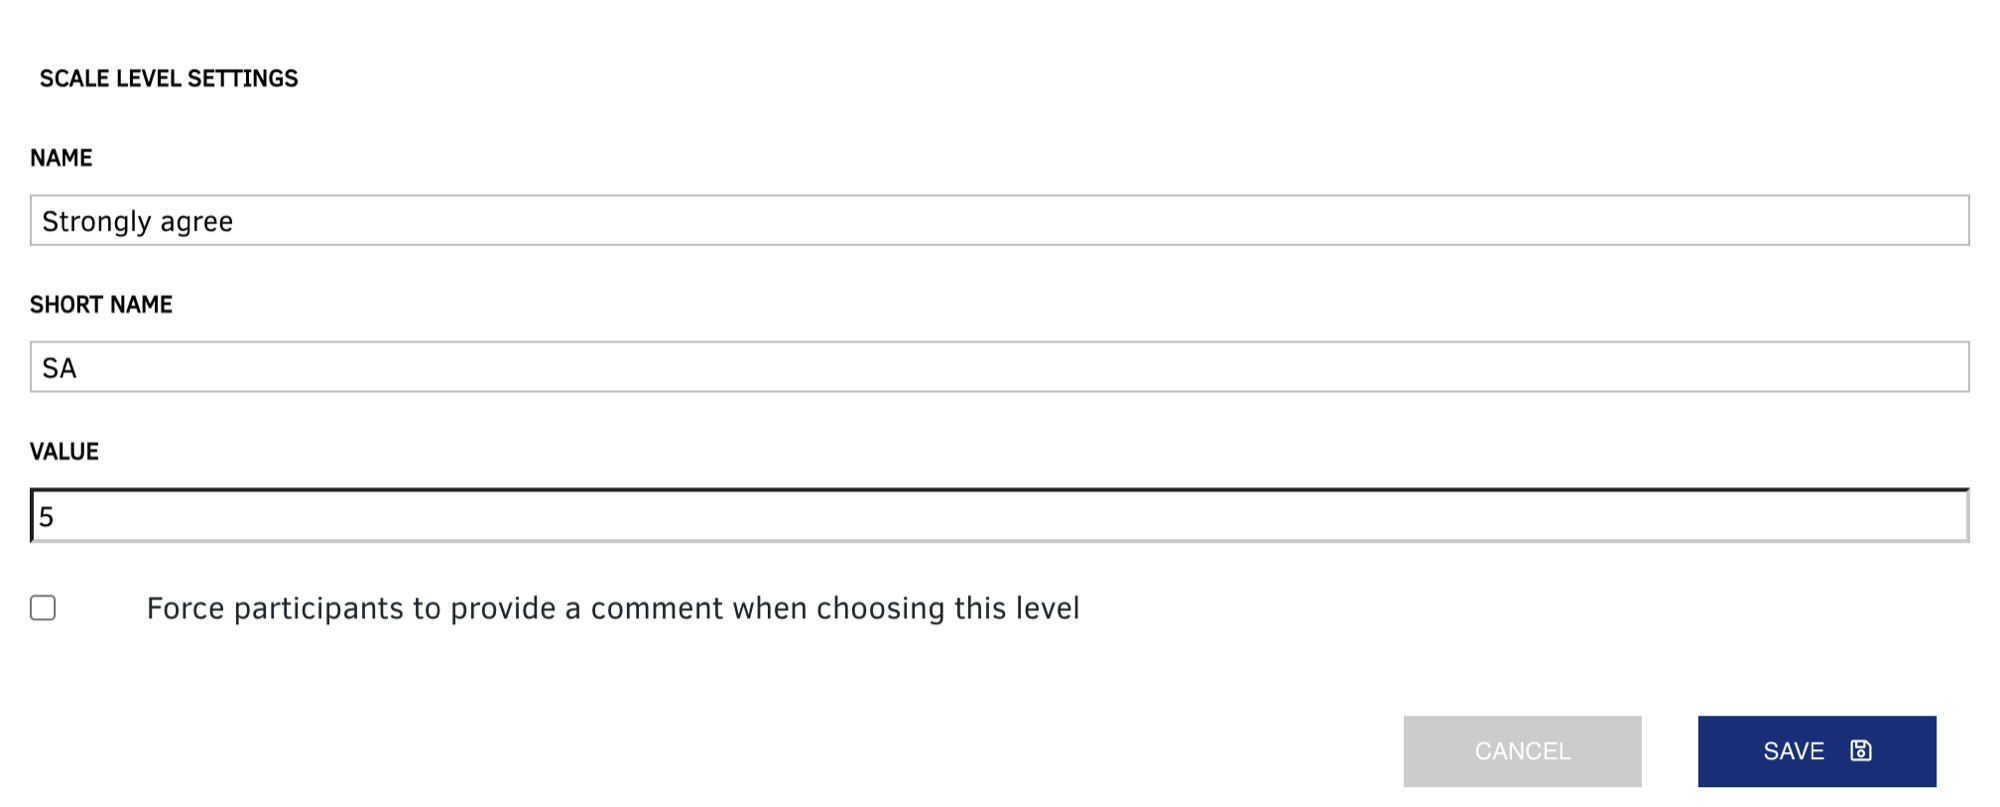
Click "ADD SCALE LEVEL" to add each level participants can choose from. For each level, set:
- NAME – the label participants see, for example "Strongly agree".
- SHORT NAME – a short version of the label, for example "SA".
- VALUE – the number used for this level, for example 5 on a 1–5 scale. It is only used to calculate the mean in "Round results".
- Force participants to provide a comment when choosing this level – check this box if participants who choose this level must explain why.
You can edit or delete each level, and drag and drop the levels to change their order.
Note: if you run an open round, where participants can add further indicators, Welphi ignores the scale.
5 – Indicators
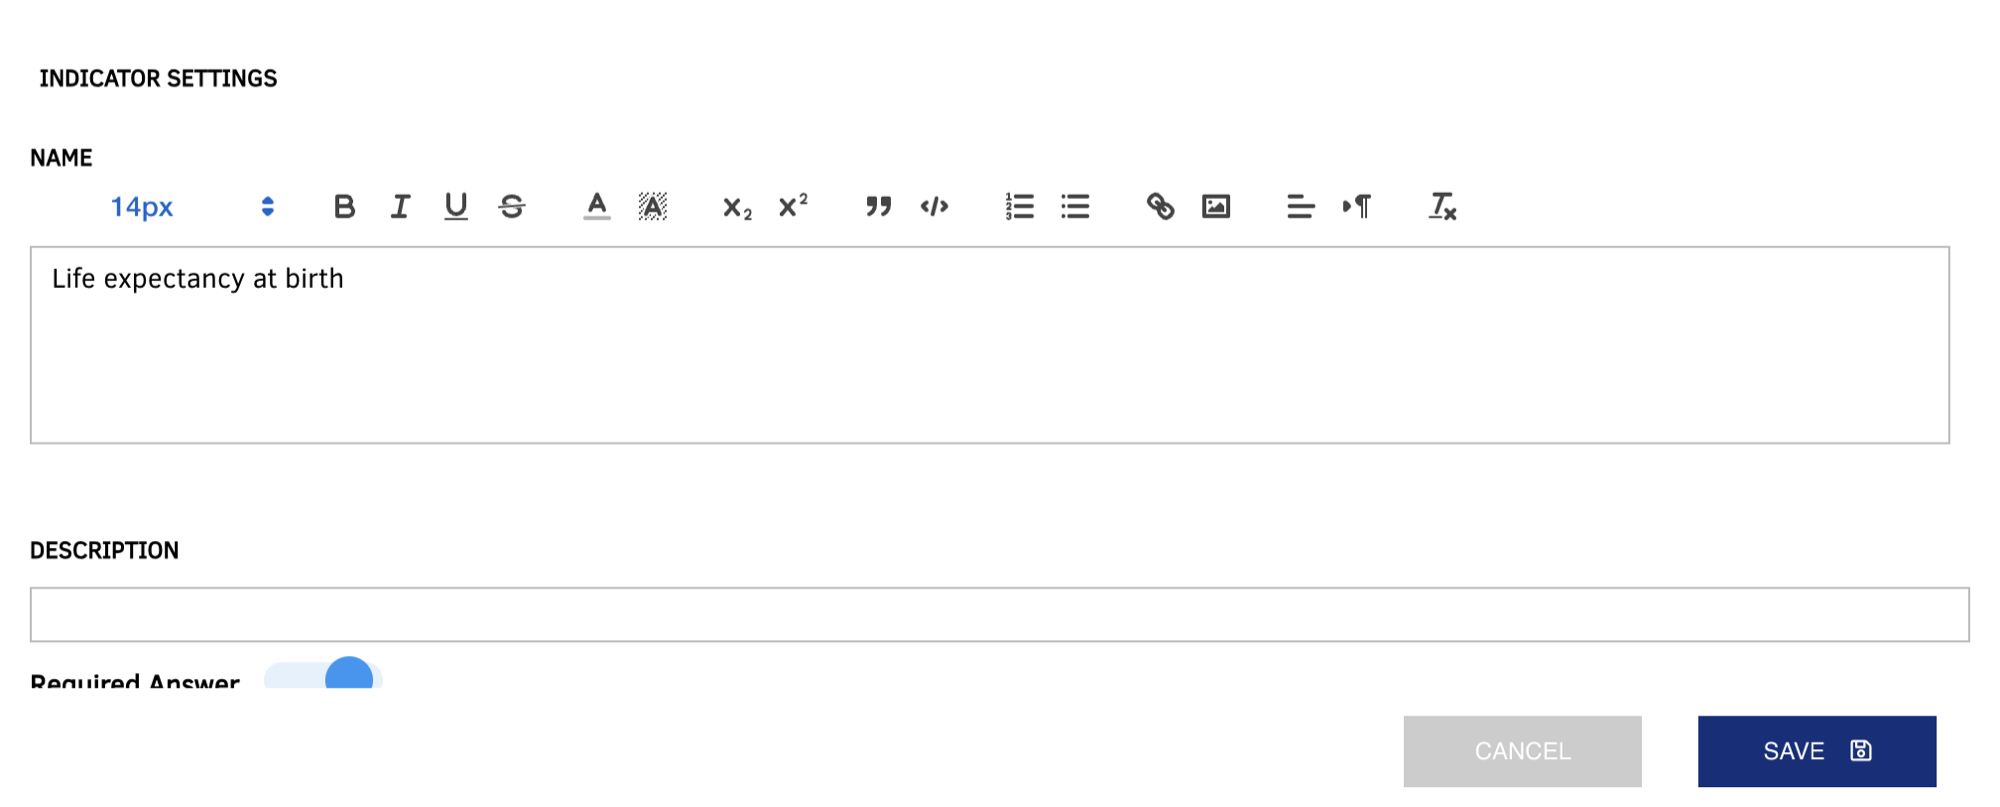
- Click "ADD INDICATOR". The "Indicator settings" window opens.
- Type the NAME. You can format it, and add links or images.
- Optionally, add a DESCRIPTION.
- Choose whether the answer is required ("Required Answer").
- If you have created custom fields, fill in their values for this indicator.
- Click "SAVE".
Once added, you can manage your indicators whenever you want:
- Reorder – re-order the indicators.
- Edit – click the pencil icon.
- Delete – click the ✕.
- Import – to add a long list of indicators at once, click "IMPORT INDICATORS". See Importing indicators into a qualitative page.
Click "PREVIEW" to see the page as participants will.
Follow-up rounds
Once all your participants have finished answering, or when you have reached a deadline, you can quickly set up a follow-up round by clicking "NEW ROUND +" in the process box on the home page.
The new round is a copy of the previous one, with the same pages and indicators.
On the new round you can only change some elements of this page:
- delete indicators;
- change their names, descriptions and field values;
- add new indicators.
Round results
To see the results of a qualitative page, click the pie-chart icon ("View page analysis") next to the page on the "Round details" screen. For a full guide to this page, including rules and how to exclude "Unable to rate" answers, see Analysing the results of a qualitative page.
Statistics per indicator
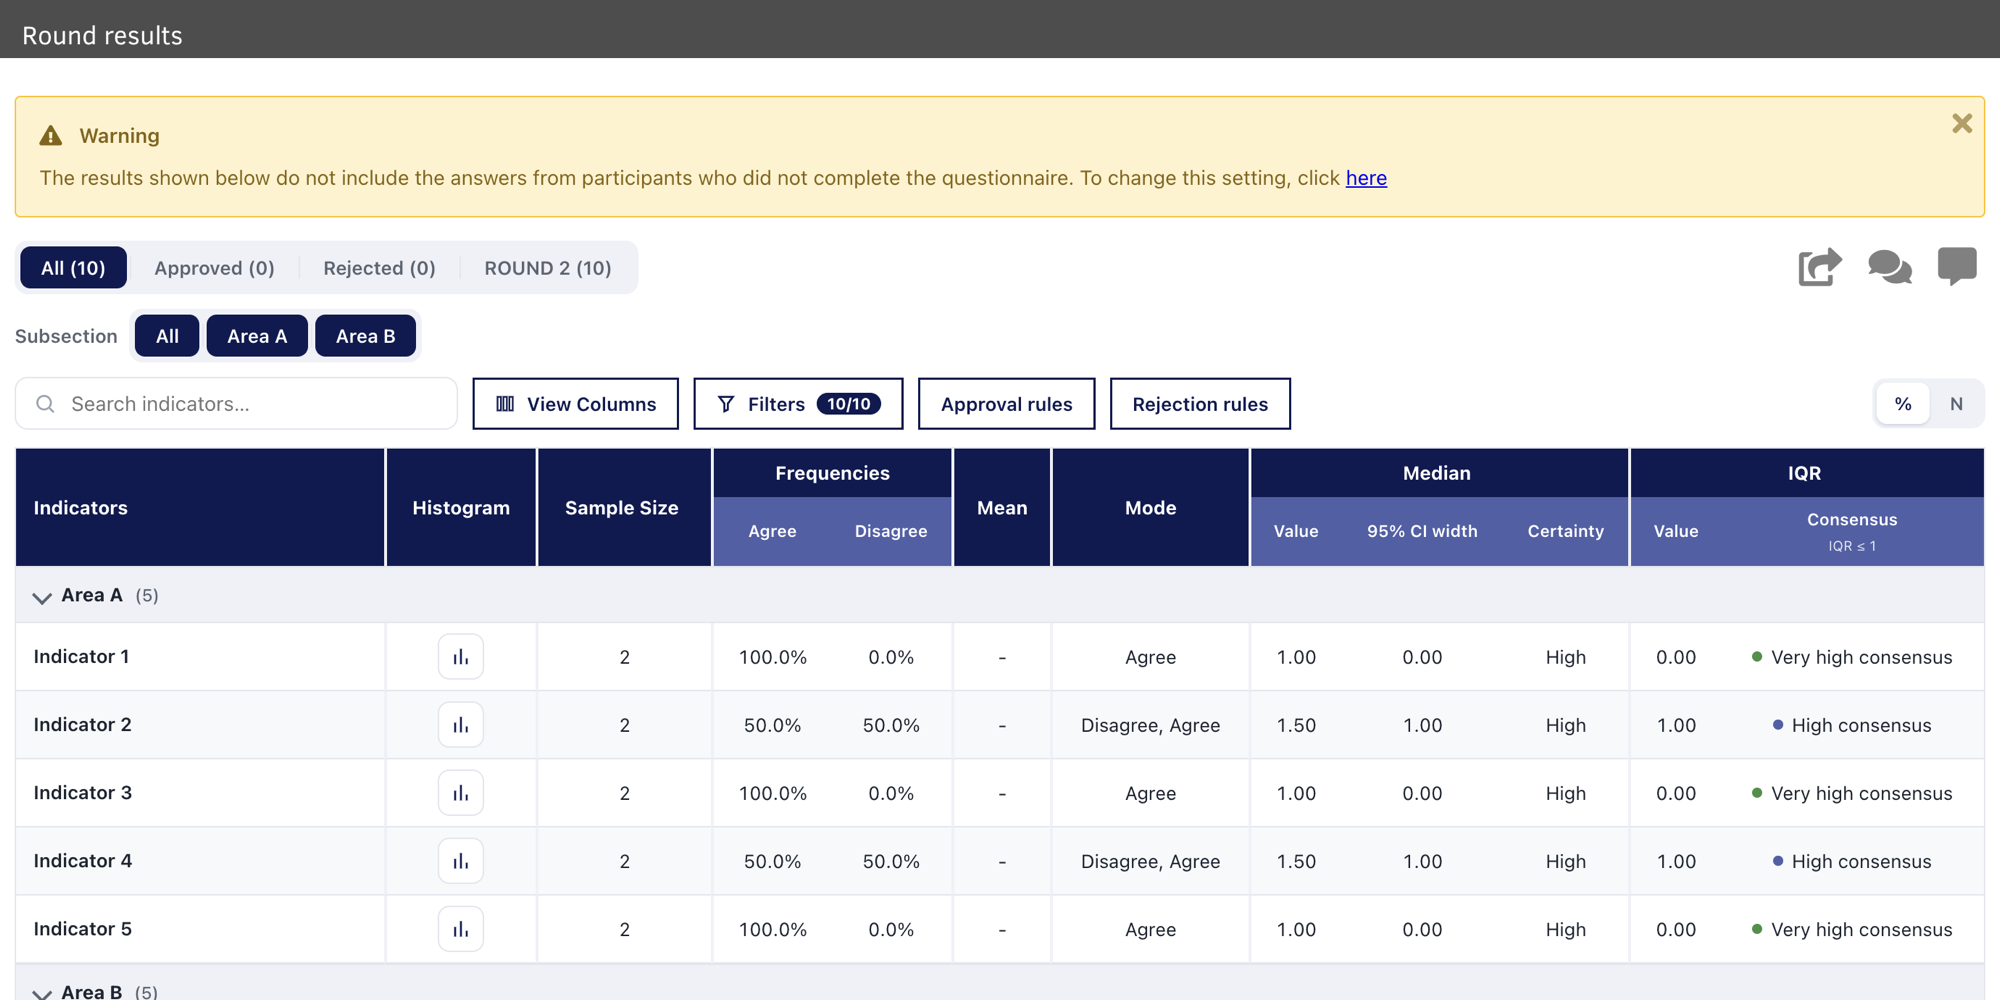
The "Round results" page shows, for each indicator:
- the histogram;
- the sample size;
- the frequency of each scale level (as "%" or "N");
- mean, mode, median and IQR;
- the level of consensus (for example "Very high consensus" when IQR ≤ 1).
Tools on the page
- Search – search indicators.
- "View Columns" – choose which columns to show.
- "Filters" – filter the list.
- "Approval rules" and "Rejection rules" – set the rules for approving and rejecting indicators.
- Tabs – the tabs at the top show all indicators ("All"), the approved and rejected ones, and the ones that will go to the next round (for example "ROUND 2").
The next-round tab can include two kinds of indicators:
- Indicators to be voted again – participants rate them again in the next round.
- Indicators already under consensus – shown again because you decided to keep them visible, but without the voting buttons.
A warning at the top reminds you whether answers from participants who did not complete the questionnaire are included (see Choosing your process settings).
Open round type
Plan: available on the Premium plan ("Propose New Item"). See Which Welphi plan do I need?.
In some cases, you may wish to allow your participants to add new indicators to the list you have set up.
- Check "Participants can add new indicators" in "Settings".
- A new button then appears in the questionnaire, which participants can click to add indicators to the list.
Please note that when you run an open round, Welphi ignores whatever scale you have set up. Since you may want to use that scale in later rounds, Welphi does not delete your scale levels; it just ignores them.